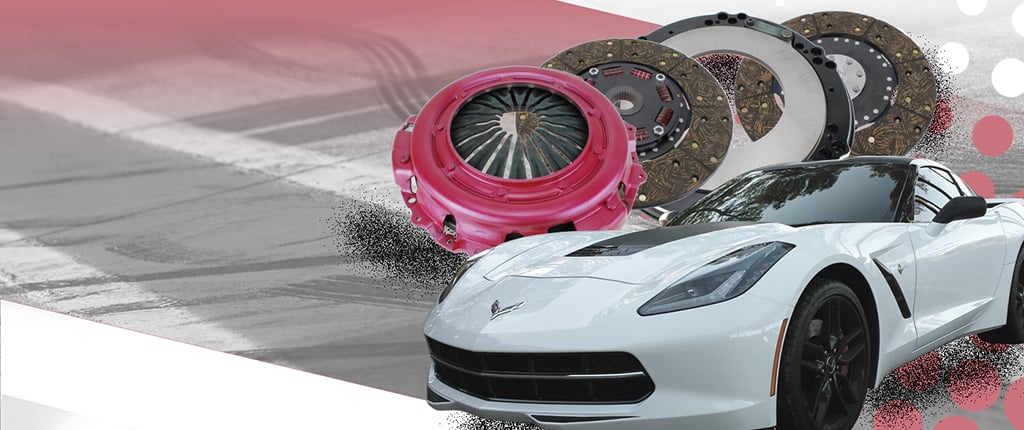
I get asked all of the time, why should I use a dual disc clutch? Or, why should I spend all that money on a dual disc clutch?
Driveability
We work hard to make all of our clutch systems as user-friendly as possible. We have been driving, racing, and tuning performance cars ourselves for over 40 years and know first-hand that trying to drive a clutch that is too aggressive on the street is just not any fun.
Less Static Pressure Needed
When you use a dual disc clutch you are essentially doubling the holding power of the clutch system without adding any extra pedal effort. This allows you to have the extra performance and increased friction surface area without ending up with a left leg that is twice the size of your right from a stiff pedal!
Less Aggressive Friction Materials Needed
By using multiple discs, we can use organic friction material for most street-driven applications and maintain a very smooth engagement and good street manners. The same application with a single disc clutch would require a more aggressive friction material that is more likely to chatter on takeoff.
More Upgradeability
Typical customers do not do their entire build at one time. It may progress over a few years starting with a few bolt-ons, then eventually grow to include forced induction or nitrous. By starting with the dual disc when you are still at the lower power levels, your combination can continue to grow without the need to keep stepping up clutch levels every time you make an improvement.
Affordability
When you price everything out, the difference between a single disc and dual disc is minimal, and taking into account the other plusses listed here to using a dual disc, it really starts to make more sense.
Better Clutch Life on the Street
Using a dual disc clutch lets you see an increased clutch life over single disc units due to the overall higher capacities that these clutches give you.
Better Clutch Life at the Track
By using a dual disc clutch with metallic friction, you will see increased clutch life at the racetrack also. Metallic friction materials stand up to the heat much better, and with the increased number of friction surfaces in the dual disc clutch, you will get better heat dissipation which equals increased life.
More questions about using a dual disc? Drop us a line at [email protected]!
Over my 38 years of selling clutches, it seems I would have seen just about every possible mistake that can be made on an install, and then someone out there pops up and surprises me! Many of these may seem painfully obvious to you, but it can’t hurt to review!
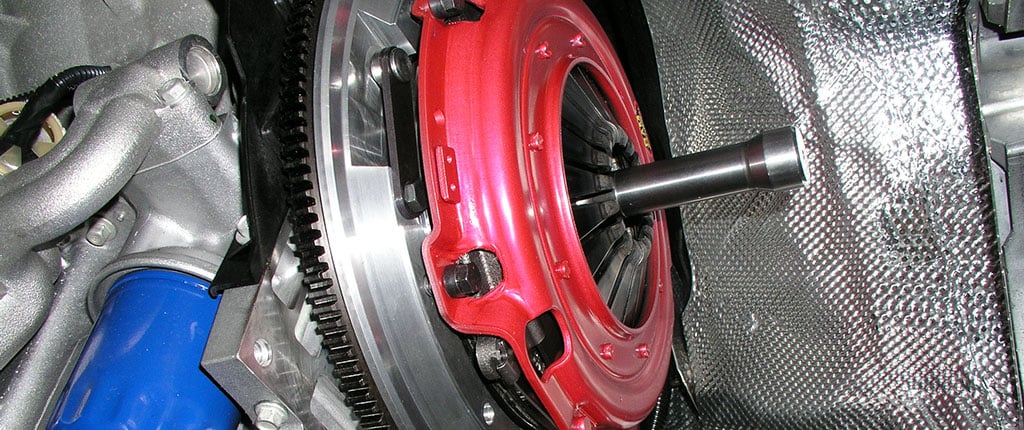
Installing the Clutch Disc Backwards
Often I wonder how this is even possible, yet we receive returned discs for alleged warranty that are virtually turned inside out bent when a customer tries to put the disc in backwards. When you have the flywheel installed on the engine, lay the clutch disc up on the flywheel and rotate it some. It must sit flat the flywheel and not be contacting the flywheel bolts as you rotate it. It the disc does not sit flat, make sure you have it in correctly, or stop until you figure it out.
Using Power Tools to Tighten Down the Clutch Cover
This is a huge no-no and written in every instruction sheet RAM has ever provided. Tightening down the cover puts a load on the clutch cover flange since you are pulling it down against the pressure of the diaphragm or coil springs. Using powered tools can cause this flange to become bent, which in turn will leave the fingers uneven once the clutch is fully tightened down. This can cause extreme clutch chatter.
Tightening the Cover Bolts Down All the Way at One Time
Another way to damage the flange of the clutch cover is to tighten the bolts down completely in one shot instead of in a star-shaped pattern. This can damage the flange and cause the fingers to sit unevenly. Tighten the cover bolts ONLY with hand tools, and use a star-shaped or crisscross pattern, a few turns at a time, just like torquing your wheels in place.
Improper Release Bearing Adjustment (mechanical or cable linkage)
Setting the proper release on your clutch is very important – not only initially, but periodically going forward. A mechanical linkage should be adjusted for minimum release; that is only enough release that the clutch will disengage cleanly for shifting. This will result in a pedal lower to the floor and leave maximum freeplay. As the clutch disc wears, the fingers of the clutch will get taller, and if you have the bearing adjusted too close, it could ultimately unload the clutch fingers and not let the plate put its full load on the disc. This will cause undue slippage and wear.
Not Resurfacing the Flywheel Before Install
“The flywheel looked pretty good so we just went ahead and installed the clutch.” I can’t tell you how many times I’ve heard this. No matter how good the surface may look, if you want the new clutch to seat properly it needs a fresh friction surface to seat against. Otherwise it would be like installing new brake pads and reusing the old rotors.
Changing Out Only the Clutch Disc
Obviously the clutch disc is the part of your system that will physically wear the most. Changing only the disc is setting yourself up for problems. As the clutch, disc and flywheel wear in, the surfaces build a taper that the clutch disc will conform to. If you install only a disc, it is going to make contact on just the outer edges and will never properly seat. Ultimately this will cause premature slippage and most likely will also chatter on takeoff.
Does this scenario sound familiar? Racing season ends and the car gets pushed in the corner or left in the trailer. Sometime around the middle of February, or in a worst case scenario about a week before the first event, you decide it’s time to start getting ready for the new season. Whoops! I forgot the clutch was slipping a little on that last pass, or it has been 50 runs since I had this thing out and inspected. Sure enough, you pull it out and it needs rebuilt.
That is the time of year that we get bombarded with rebuilds and RUSH rebuilds. Not only does it put you in a bind to get everything back together in time, it is hard for us to process the unit thoroughly and get it back to you in time.
So what should you do in the offseason?
CLUTCH INSPECTIONDo this sooner rather than later. Now is the time to make sure you have all of your clutch components fresh and make any changes or upgrades to the system to improve performance.
PRESSURE PLATEInspect for warpage and signs of extreme heat. A pressure plate will build a taper to the inside edge over time that grabs the clutch disc only on the outer edge. This can either cause the clutch to get more aggressive on launch, or slip on launch. High heat signs include bluing of the metal, shiny spots on the surface, and heat cracking or smearing in extreme situations.
CLUTCH DISCHere you need to know your minimum thickness and the number of runs on the disc. On sintered iron clutches, you will usually hit the run limit before you wear it out. We recommend no more than 75-100 passes on these discs as the hubs and rivets will tend to fatigue over time, and if this disc comes apart, it will cause major damage in the bellhousing, or worse…
FLYWHEELSteel or aluminum flywheels should be inspected for the same signs of wear as the pressure plate. Many times the flywheel can be resurfaced, but with aluminum flywheels it may be necessary to replace the insert.
Keep in mind that these components wear as a system. As the disc wears and surfaces on the pressure plate and flywheel wear, the disc will conform to those surfaces. Thus, just changing a disc or pressure plate and using other components that are not fresh and flat will not allow for proper seating of the new component. This will throw your combination way off when you hit the track, or worse yet might just fail.
While you are inspecting these components, be sure to check all of your backup parts. There is nothing worse than being at that first event of the season, having an issue, and when you go to change out the clutch all you have is last year’s worn out backup that you forgot to send in for rebuild!
The offseason is also a good time to review your run records and data and determine if other changes to the car may help improve performance. Rear gearing, transmission ratios, tire sizes and types can be modified or changed based on the data you review to help improve your performance for the upcoming season.
If your budget and time allow for it, plan to test over the early months of the year. This track time is valuable to helping improve your performance for the season, and allows you to try different combinations and parts away from the time constraints of big events. Remember that great teams are built in the offseason, so choose to be different and ready for the 2020 season!
Avoid these pitfalls when making your single disc clutch set selection
Previously, we have discussed many of the factors to consider in selecting a clutch for your application. Now let’s take a look at some of the things NOT to do when selecting a single disc clutch set.
Not taking into account your expectations from the clutch system
When we spec out a clutch for your application, the most important thing is to understand your expectations. Are looking for smooth engagement? Is holding power at the track the most important thing for you? What about balance? We always ask these questions when customers inquire about the clutch selection. Understanding your expectations and what you hope for the clutch to do helps us determine the right build for your vehicle.
Ignoring load factors
If you haven’t reviewed our previous blog about load – this is a good time to do so. Don’t fall into the trap of picking a clutch system solely based on the ‘rating’ of the unit.
Assuming that the clutch rating is etched in stone
This goes back to the load factors (as you can tell, this is important). We have seen plenty of situations in which a customer selects a clutch rated for up to 650 horsepower and it slips at 500. We also see the opposite happen. A customer is using a clutch with a rating far below the power level. Be sure to take into account the load factors, use, and driving style in your selection.
Reading the wrong information online
There is good information on the Internet and you can learn a lot about clutches and your system. But beware of “keyboard jockeys” who post and may not have any experience with a particular clutch (but they do have a lot of opinions). Do your research on who’s writing the content you’re reading and make sure they have knowledge and experience with the product you are interested in.
Picking a clutch because ‘that is what my buddy uses’
Similar to reading online, don’t be deceived by information that may not apply to you. You may think your cars are the same, but when reviewing the load factors you will see that there are differences that need to be taken into account before making your final selection (tires, shift RPMs, gearing, etc).
Buying a cheaper unit because it’s ‘all you can afford right now’
If this is the case, you need to carefully consider if it is worth waiting a little while until you can purchase what you really need!
Under buying when you know future mods are coming
Think about your long term plan for your vehicle. A future mod that will be beyond what your system can handle is something to consider. Better to step up now and make sure you are covered into the foreseeable future.
What are the mistakes that you have made in the past? We would love to hear from you. Check out our blog and our YouTube channel for more information on clutches and the work we do.
You’ve been thinking about installing a hydraulic release bearing in your vehicle. This is a great choice for gaining valuable space in your engine compartment and simplifying the clutch release system. Before you pop the hood, let’s go over some common mistakes (with real examples) to avoid for your installation.
1. Not Taking Your Time with the Install
A hydraulic bearing install is not a simple drop-in Carefully read the instructions and make sure you understand how to install the bearing will save you countless hours of frustration. Read the instructions. Re-read the instructions. Then watch our tutorial that walks you through the complete process.
2. Not Precisely Measuring the Setup
It’s critical to have the correct measurements. We provide very detailed instructions and video to help you through the setup of the bearing. A setup sheet gives you the exact measurements you need to successfully install the bearing. You’ll need a quality set of dial calipers for your measurements. Take your time and check to make sure your numbers are accurate . If you email for tech support, we will ask you for these measurement numbers!
3. Not Using Teflon Tape on the Fittings
The inlet fittings to the hydraulic bearing must be installed using Teflon tape. You may think you have a super sealing liquid or other miracle product; don’t fall for it. Trust us, we have personally made this mistake.
4. Improperly Diagnosing Leaks
Nearly every call we receive involving a leak with the hydraulic bearing can be attributed to the fittings or hose connections. The best way to diagnose the origin of a leak is to hang the bearing under the car with the lines connected and have someone operate the pedal. Pinpoint the cause of the leak precisely using this method BEFORE you contact us. This will save you lots of time that would be lost if you sent us the part without locating the leak.
5. Improper Orientation of the Bearing/position of the Bleed Fitting
For easiest bleeding of the bearing, the fittings should be angled between the 9 and 3 o’clock positions. Do not point the fittings down. The top fitting should be connected to the bleed line. When you perform the bleed the fluid is forced up and through the bearing, reducing the chance of air bubbles.
6. Setting Too Little or Too Much Bearing Clearance
Let’s be frank. Both of these are bad. If you do not set up the minimum clearance of .150”, you are not leaving enough room for the clutch to wear and it could fail prematurely. Setting up too much gap will cause the bearing to bottom out on the snap ring. This results in non release of the clutch, or potentially blowing the bearing off the piston. Keep in mind – the RAM bearing is a constant contact bearing and once you cycle the pedal, the bearing only returns as far as the clutch fingers push it back. It is always starting right at the fingers.
We have created a specific E-tech form just for hydraulic bearing questions or issues. This starts the conversation so we can help if you have questions or issues. Avoid these traps and you will enjoy your hydraulic bearing installation for years to come!
Why does RAM Clutches race? We could just build our clutches for street or street/strip based on the OEM design, add more aggressive friction material, and call it a day. This is called ‘bottom-up’ design. But we do things a little differently. RAM chooses to manufacture specific units for a variety of classes from Pro Stock to Street Stock. We then use ‘top-down’ design and apply what we learn in abusive racing conditions to build a much better product for the street or street/strip applications. The result of this is excellent performance while maintaining driveability, which means you get the most enjoyment out of your vehicle.
Working with our race teams provides us with valuable knowledge and feedback that helps our design team build a better product for you. We are not just at the track putting stickers on cars for promotional purposes. We are there to learn! We constantly evaluate different types of unit weights, static pressures, friction materials, and release pressures to achieve the best performance for a given application and situation. The end result is we are able to offer products that perform well in your car.
What does this all mean for you? To provide the best possible product for your application, we need to have the most accurate info about your car in order to make a recommendation. It is why, in previous articles, we have explained in detail how to evaluate your application based on the load the vehicle will experience. We’ve set up our E-Tech help tool to make asking questions and improving your system simple and easy.
Is your muscle car a track car or a cruiser? Will it be taken to the track once a month or just to see how it will run? Is on-track performance of the utmost importance to you or is low-end driveability? Will you make further upgrades on the build or are you buying a clutch for the completed project? These are questions to keep in mind when working with us. The answers will help provide the highest performance product for your needs.
Looking to get started? The RAM E-Tech tool is the best way to communicate. Once we know more about your situation, we can take your information and evaluate exactly what the expectations are for your application.
We want to understand your car and how you intend to use it so we can help. Whether you are restoring a Muscle Car with a crate engine and Tremec Transmission or turning your late model Camaro or Mustang into a beast at the racetrack, we’re here to build the best system for you.
In previous posts, we’ve discussed the load factors of your clutch system and how to use this info to make the best clutch selection. Now it’s time to look at some of the situations that put a hard load on the clutch, and create the most opportunity for the clutch to slip, wear prematurely, or even break. I’m sure that none of you have ever done any of these things…
Chassis Dyno – The chassis dyno will inflict about the most load on the clutch system. There is no tire slippage (in most cases) and the goal is to load up the drivetrain to the max in order to tune and obtain numbers. Taking your vehicle from the install lift to the dyno rollers with no break in and you are asking for the clutch to slip.
Taking off in the wrong gear – Whether intentional or unintentional, the load from taking off in a higher gear is extremely hard on the clutch system. We see customers trying to leave in 2nd gear at the track in order to reduce tire spin. It will probably do that… and also cause the clutch to slip or wear out quickly.
Traction control at the race track– Always make sure you turn traction control off when you are at the race track (or on the dyno). Traction control methods will load the clutch system harder and increase the risk of damage to the clutch system.
Shifting 1st to 2nd, then back to 1st – Most good racers will admit when this happens, it inflicts a severe reverse load on the driveline that can cause clutch hubs, diaphragm straps, or in severe cases, clutch covers/rings to break.
Not rev matching on downshifts – Autocross and road racing is where this is most common since downshifting it is critical to match RPMs as you re-engage the clutch. Failure to do this will put a hard reverse load on the plate or floater and straps, causing bending or breakage. In other words, you will not be racing anymore that day.
Lugging the engine at low RPM – If you have ever driven along and the RPMs dropped enough for the car to start ‘bucking’ or ‘jumping’, you have lugged the engine. This puts extreme stress on the clutch hub center section and is a big cause of clutch disc breakage.
Not clutching at the end of a big drag strip pass – Don’t use your engine as a brake at the end of a drag strip run. Push in the pedal and kick the car out of gear – the reverse load against the clutch can cause damage or breakage.
These are just some of the major situations we run across on the tech line. You may have invented your own – if so, we’d love to hear about it! Be smart about how you treat and use your clutch system and it will be your friend for a long time.